Wednesday, July 31, 2013

Mini Pic of the day - July 31, 2013

Pestered.........I'm being pestered to post today's pic.  It's nice to have fans but come on.......I have a life.  Just kidding! 
Since I'm at work I thought I'd see what I have on my phone.  I found a very cute picture. 
I did not make this chair.  I got it in a swap from Ginger.  It looks so cute on the well placed spoon, for scale.  Its a 1:48 scale chair that I still have not found a home for.  I love it and can't wait to use it.

Monday, July 29, 2013

Mini Pic of the Day - July 29, 2013

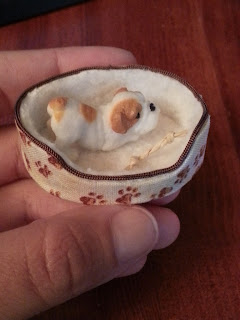
I made the cutest little dog bed today.  Full disclosure......it's not an original idea. 

I was browsing a mini mag online and came across the cutest and easiest dog bed ever.  Full tutorial with pictures which makes it very easy to make.  It's made out of a toilet paper roll, small piece of cardboard, scrap of fabric, some cotton batting, trim and glue.

I raided my stash....and therefore it's practically free.  It didn't take long either.  I added a little dog that I have in my supplies, and a little dog toy that I made a while back. 

Isn't it the cutest thing ever?????


Sunday, July 28, 2013

Mini pic of the day - July 28, 2013

So todays mini pic is a problem I've encountered.  I had purchased some dollhouse furniture from Dollarama quite a while back.  They are stained a red-ish colour.  I decided to paint one of them white for the baby nursery.  I painted some of it but left the bottom the original finish so I could stand it up to dry.  I'm glad I did otherwise this post would not exist. So, I painted it, and then had to go out.  I came home to a bubble gum pink dresser.  Oh no.....baby mini is a boy not a girl.  So if anyone has a suggestion on fixing this I'd appreciate your help.  I don't know if just painting more white will help.  This was just a first coat.  Thanks.

Saturday, July 27, 2013

Mini pic of the day (Jul 26&27)

So yesterday I was out most of the day and I didn't get to post my pic, therefore today you get 2 pictures. Yay!!!!
They are both from my miniature Valentine Shop (1:12 scale).  One is a tray of purfumes that I made from some beads and jewelry findings.  The other shows one of the shelves in the shop.

Thursday, July 25, 2013

Nursery Changing Table

So....as you know (if you've been reading my blog) I have the Vermont Farmhouse Jr.  I purchased it in 2006 and seven years later, it's still a work in progress.  This was my first miniature purchase, and the building of the house was fast and looks wonderful.  It's just the inside that I have been struggling with.

Earlier this year I electrified it, and I have slowly been trying to get it decorated.  It should not have taken me this long to get this far....which really isn't that far at all.

A while ago I started to work on the nursery in the house, and wanted to make a changing table.  I didn't feel like building it from scratch, so I bashed a Michaels hutch.  Long before I got my new supply of hutches in waiting.

So because I started this project a while back, some steps are missing as far as pictures go, but I will explain those steps.

This is the hutch that I started with.  The first thing that I did was remove the whole upper part of the hutch.  This usually can happen quite easily if you put pressure on both ends like you want to snap it in half.  However, if that scares you, you can always take a saw to it, and saw the top half off.


This is where I didn't take a picture of the hutch with the top off.....so bear with me.  I used some thin stripwood and cut to size and glued it along the back of the table and sides (see pic).  I also removed the two outer doors because I want to be able to see the shelves, but I kept the middle door.  Then I painted the whole thing white.


Next step was to put a changing pad on the table.  So I cut a piece of thin cardboard from a Cola case to fit in the opening on the top of the table. 


Next I cut a piece of felt to put on top of the cardboard to give it a softer look.


I trust that so far these instructions are pretty easy to follow.....So now I just dry fit the cardboard and the felt on the actual table to make sure it's a good size.  Dry fitting is so important.


Looking good so far.  Now I picked out my fabric that goes with the nursery theme and I cut it a little larger than the cardboard, about a 1/4 inch around.


I glued the felt onto the cardboard and then I snipped the corners of the fabric to make it easier to glue around.  And lay the cardboard, felt side down on the "wrong" side of the fabric.


Now it's the scary part....gluing the fabric in place.  I like to use Aleene's Quick Dry Tacky Glue.  It's my favourite as it doesn't take hours to dry.  I can't get enough of it.  Anyway back to the fabric!  Put a small line of glue on the edge of the cardboard and turn the fabric over, press into place and then what I do is use clips to hold it in place to dry.  It shouldn't take very long to dry, and then you can do the same for the other sides.


Once it's dry, I glued it into place on the table and voila......a super duper easy peasy nursery change table. 


I hope you liked this post.....and I can't wait to fill it with tons of goodies.  Oh and if you haven't guessed yet.....IT'S A BOY!

Mini Pic of the Day - July 25, 2013

Today's pic of the day has a funny story with it.  For a long time one of my 1:12 scale dollhouses was sitting in my dining room.  Unfinished of course (all miniaturists can relate).  I did however have some rooms done.  One being the bathroom. 

For some reason, I had two naked dolls in the house.   Not sure what happened to their clothes. 

I live with 3 boys....and that number includes my husband.  So pretty much daily I would find Mr. and Mrs. Mini Doll is some pretty interesting situations.  I won't go into detail, use your imagination. 

One morning, I came to find this:


My stepson Kurtis thought it would be funny to put Mrs. Mini Doll on the toilet, and Mr. Mini Doll on the other side of the door holding the paper roll.   Side note: What is up with Mrs. Mini Doll's hair?!?!

Anyway, how could I be upset, this was hilarious.....and boys will be boys.

Wednesday, July 24, 2013

Mini Pic of the Day

Here's today's picture.  It's a quarter scale Art Studio/Room in my Villa house.  This room is only 2.5" tall by 1.75" wide.  One of my favourite rooms to date.


Update

Just a quick update post.  So, Michael's hutches......gone right?  Well I have a friend that found a bunch at a Michael's quite a bit away from where I live.  She was nice enough to pick me up some....15 to be exact.  I am so happy to have a bunch of these in my stash.  You never know when you might need one, or bits of one.  I love hutch bashing..... So thanks bunches Sonya.

In an attempt to blog more often I have decided to do a daily post called "Mini Pic of the Day".  It's exactly what it sounds like.  I take a picture of some random miniature thing and post it.  Old projects, something someone has sent me, trash to treasures etc....

Hopefully that will get me more dedicated to this blog.  That being said, it's always better to write when you have readers.....so please feel free to pass along this blog and encourage people to follow it.  The more the merrier. 

Crystal

Tuesday, July 9, 2013

Sad News

Well I just found out that a "mini" friend passed away today from complications of pneumonia.  I am very sad to hear this.  I never met Jan in person but for the many years that I have been in miniature groups and swapping, I have had the pleasure of participating in a few swaps with her.  She was a very talented miniaturist. 

Just two weeks ago I received an amazing 1/4 scale doll from her.  It was part of an Alice in Wonderland Swap.  She made a Mad Hatter.  It's probably one of my favourite items that I have ever received in my years of swapping.

Tonight my thoughts are with Jan's family during this hard time.  Goodbye Jan.


Look how small it is. 
Mad Hatter standing on a 1:12 scale chair.


Monday, July 1, 2013

A Little Crazy About Mickey Mouse

Hi everyone.....it's been a while since I posted anything but I just finished a small project so I thought I would post about it.

Not sure if any of you know, but I collect PEZ dispensers.  Recently a friend ended up with a bunch and knowing that I collect them, decided to give me them.  One at a time.  Over many months....
They are a very welcome addition to my collection.  It got me thinking that I needed to do something in return, to say thanks.   Which brings me to this project.

She loves everything Disney, and since Mickey Mouse is the Big Cheese....I decided to do a small filled hutch for her.  Mickey Moused out !!!

I started with one of those little hutches that Michaels sells, or rather used to sell.....man I am going to miss those.  This one to be precise.  I forgot to take a before picture so I got this one online. 

Michaels Hutch, unfinished.
I removed the feet and removed the doors on the top.  I also removed the door knob from the middle cabinet door.   My goal was to make the hutch look like Mickey Mouse.  So I painted the top part of the shelf black, and the bottom half red.  I pained the door knobs white to look like the buttons on Mickey's pants, and I used yellow pony beads on the bottom as feet.  I lined the back of the shelf with scrapbook paper that was a red on red with Mickey heads.  I gave it a once over with satin varnish....at first I was not happy with that look, but now I like it.

The painted shelf before filling it.
Once I had that finished I had to come up with stuff to fill it with.  This took me a little longer than planned, but very happy with the outcome.  On the bottom shelf (above the cupboards), I decided to make a picture frame and put a picture of my friend and her husband from Disneyworld.  I had to find one on facebook (blushing....since she will likely be reading this.....Sorry SC !!) I made the frame out of 3 black buttons to look like a Mickey Head.  I love the way it turned out.  I also put a little tea towel with a Mickey Head, and a cookie jar made to look like Mickey out of some painted beads. 

Picture frame, cookie jar and towel (can't see it but it has a Mickey head on it).
The top two shelves were also fun to do.  I took a white tea pot and put a Mickey head on it....spelt out Mickey with letter beads, and took a square wooden piece and stuck these cute Mickey tile stickers on it to resemble some kind of decor.  I think of it as a box that is holding tea possibly.  The next shelf has two Mickey glasses and two "Collector" plates (made from paper).

Tea Pot, plates and glasses.
So here is a look at the finished product.  I think it's super cute.  Hopefully she will like it.
I left the bottom cupboards empty....that way I can make more stuff for her to put in it.....sort of spread the love like she did with the PEZ dispensers. 

ALL DONE
Oh, one last thing.......I had to sign my work right!  So on the back I left my mark.

Related Posts Plugin for WordPress, Blogger...